

The wind foiling jibe is the most difficult part of wind foiling and at the same time also with most cool part. Below you will find a step-by-step instruction on how to learn this yourself. We have experienced that the ideal wind is about 12 knots, as it does not blow too hard, but it is enough to stay in the air easily.
Basic instruction
- Move as little as possible, every move causes imbalance, so chances are you’ll fall or your board hits the water.
- Keep the movements as small as possible – > everything is enlarged on a wind foil factor of 6 x
- The place where you stand/weight is in every step is even more important than with just windsurfing
- We know from experience that learning jibes is easiest with a smaller sail (about 6.5 m2) without cambers with a wind force 4
- A large front wing or longer fuselage (allowing the front wing to be far forward) helps enormously to jibe
- Keep the weight as good as possible right above the board
- You take a lot more time and space with wind-foiling jibes than windsurfing. So try to forget about windsurfing 🙁
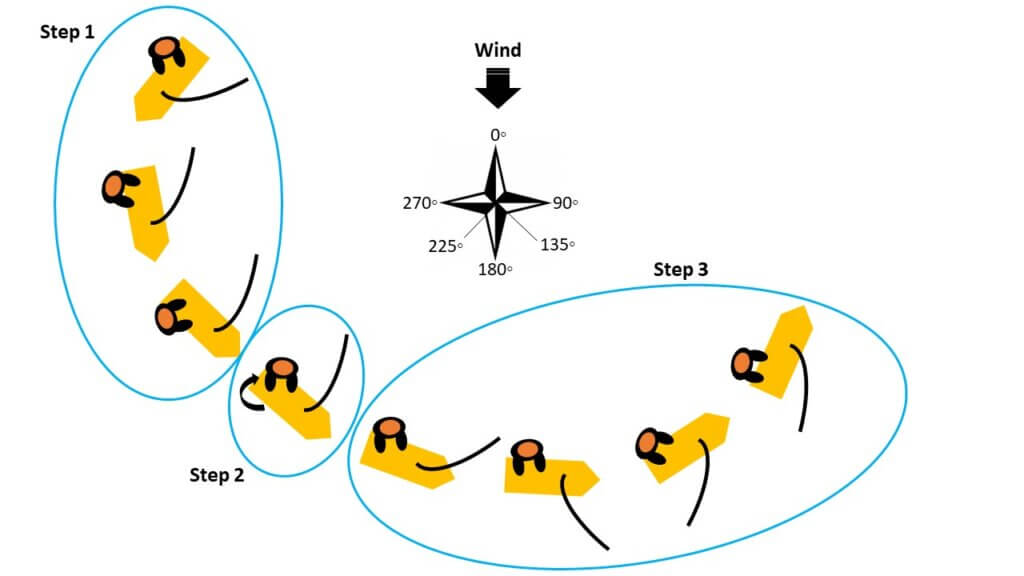
Using the video below, we try to get you started. At the bottom of the article is a drawing with the different angles in which you windfoiled in the different phases. Lots of viewing pleasure and good luck
Step 1
At this stage, prepare the jibe
- This is the easiest step, which most closely resembles just windsurfing
- Remove the rear foot from the foot strap and put it in the middle (centre line) on the board just before the rear foot straps
- Slowly go down wind and release the pressure in your sail a bit (keeping your sail closed can also, but is a bit trickier at first)
- By discharging the pressure in your sail, your board will want to go up, compensate for this by placing your weight slightly forward
- If you go down wind even more, you notice that the pressure in your sail is decreasing, which is nice to have the sail knocked over later
- You turn quietly to about 135 degrees* (so down wind the other way, see drawing at the bottom)
- With very little wind (< 9 knots) the sailing speed can be higher than the wind speed, making it difficult for your sail to turn over.
- As you can see in the video you go quite long for the wind (about 20 meters)
Step 2
At this stage, balance, speed and control are the most important. This is the hardest and scariest step:
- If you have the nose of the board at about 135 degrees*, then you step in 1x to the other side (without turning your sail)
- Make sure you stand straight on your board, so this is different from just windsurfing! This also keeps your weight straight on your board
- In order to move as little as possible, we recommend removing the front foot from the foot strap in 1 x and placing it next to the other foot (i.e. in the middle, just in front of the rear foot straps)
- And then immediately after placing your back foot in the other front footstrap. Therefore, it helps if your back foot is already in the middle and just in front of the rear foot straps, so that the distance is not too large
- Steps 3 and 4 follow directly on top of each other (so you only stand for a fraction of a second with 2 feet next to each other)
- This is really the critical moment because; a) So you are not in a footband for a while and b) So you more or less cope (points 3 and 4), which disturbs the balance
- Placing the new front foot directly back into the front strap has 2 advantages; a) You are quickly ‘stuck’ on your board again and b) You have 1x the final position on your board, so that the balance is not disturbed again
- The more you can leave your weight (and therefore your feet) in the middle above the front wing, the easier this step is
Step 3
- You are now on the new side of your board with only your front foot in the foot strap.
- Often the speed (and therefore upward pressure of the foil) has decreased
- You compensate for this by hanging a bit more backwards
- At the same time, you’ll save your sail and continue to go upwind
- Please note! By turning your sail (and especially with a sail with cambers) you generate a lot of downward pressure, which makes the tip of your board want to go down. This also compensates you by placing your weight backwards
- You’re on the ‘new’ side now and your sail has also flipped over. Due to you go up wind now, your board will quickly speed up again, which will cause the foil to generate more lift. Time to put your weight back forward
- Once you’re stable again, you can also place your back foot in the foot strap
* Depends on which way you go. 135 degrees is a.o.